

Manage WordPress plugins
The Plugins page lets you review and manage the WordPress plugins installed on a website from the Pressidium Dashboard.
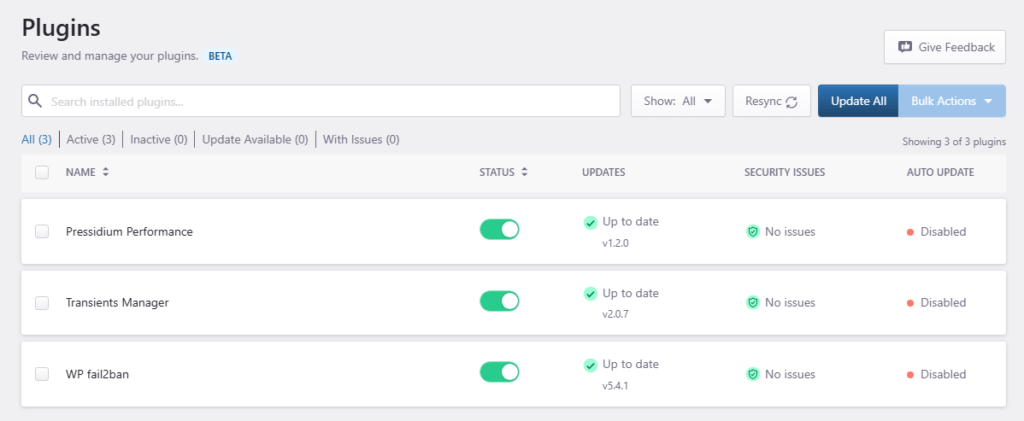
Use this page to search and filter plugins, check their status and version, review available updates and security issues, and perform plugin actions without logging in to WordPress.
Access the Plugins page
- Log in to the Pressidium Dashboard.
- Select the website you want to manage.
- Go to WordPress.
- Click Plugins.
Sections included
- A top bar for searching, filtering, updating plugins, plus some bulk actions
- Plugin list, for reviewing each plugin’s status, installed version, available updates, security issues, and auto-update status
Top bar

Search and filter plugins
Use the search field, Show menu, or status tabs to narrow the plugin list.
Available filters include:
- All
- Active
- Inactive
- Update Available (to review plugins with a newer version available)
- With Issues (to review plugins with reported security issues)
Resync plugin information
Click Resync to refresh plugin information from WordPress.
Use Resync when:
- A plugin was recently installed or removed
- A plugin was updated through WP Admin
- A plugin’s status changed outside the Pressidium Dashboard
- Version or security information appears outdated
- The number of listed plugins does not match WordPress
Update all plugins
Use Update All to update every plugin with an available update.
- Review the plugins listed under Update Available.
- Click Update All.
- Confirm the operation if prompted.
Bulk Actions
You can also select multiple plugins and use Bulk Actions to apply an available action to the selection.
Available bulk actions may include:
- Activate
- Deactivate
- Update
The available actions depend on the current state of the selected plugins.
Plugin list
The list includes the following columns:
- Name: Use the checkbox beside a plugin to select it for a bulk action. The table heading checkbox selects all plugins currently listed.
- Status: Shows whether the plugin is active or inactive. Use the switch to activate or deactivate it.
- Updates: Shows whether the plugin is up to date, whether a newer version is available, and which version is currently installed.
- Security Issues: Shows whether a security issue has been reported for the installed plugin version. Plugins without a reported issue are marked No issues.
- Auto Update: Shows whether automatic updates are enabled or disabled for each plugin.
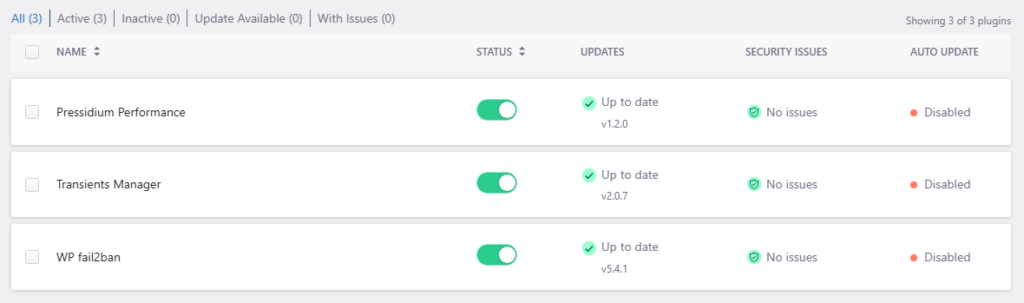
Use the available action in the Updates column to update an individual plugin. Use the switch in the Status column to activate or deactivate it. To manage multiple plugins, select them and use Bulk Actions.
Verification
After updating, activating, or deactivating a plugin:
- Confirm that the background job has completed.
- Refresh the Plugins page or click Resync.
- Check the plugin’s status and installed version.
- Visit the website frontend.
- Open WP Admin.
- Test the functionality associated with the changed plugin.
- Review the website error logs if unexpected behavior appears.
Best practices
- Prioritize plugins with reported security issues.
- Review updates to WooCommerce, LMS, membership, form, caching, and security plugins carefully.
- Avoid changing several critical plugins at the same time unless the changes have already been tested.
- Keep unused plugins inactive, or remove them from WordPress when they are no longer required.
- Use Resync after making plugin changes directly in WP Admin.
Need help?
If a plugin update, activation, or deactivation causes unexpected behavior, contact Support and include:
- Website name
- Plugin name
- Installed and target versions, if applicable
- Action performed
- Approximate timestamp
- Screenshot of the issue
- Any visible WordPress error
- Relevant error-log entries
Where to go next
After reviewing plugins, continue with the guide that matches the task or issue.
- Install the required connector by following Install the Pressidium Performance Plugin.
- Change optimization options through Configure Performance Plugin settings.
- Investigate conflicts with WordPress plugin conflicts.
- Resolve connector-specific issues with Performance Plugin troubleshooting.
Was this article helpful?