

Install & activate the Performance plugin
The Pressidium Performance Plugin is a free WordPress performance plugin that helps improve front-end performance through image optimization, CSS and JavaScript optimization, and background processing.
If your site uses Pressidium EDGE, the plugin also provides the WordPress-side integration with EDGE, giving you access to EDGE-related features and controls directly from WordPress.
Use this guide to install and activate the plugin and open its settings for the first time.
Install the latest plugin version from a zip file
To install the latest version with EDGE integration:
- Download the plugin installation archive from https://pressidium.com/wp-content/pressidium-performance/pressidium-performance-latest.zip.
- Log in to your WordPress admin dashboard.
- Go to Plugins → Add New → Upload plugin.
- Click Choose File, select the ZIP file without extracting it, then click Install Now.
- Once installation finishes, follow the Activate the Plugin section to activate the plugin and proceed to setup.
Install the plugin from WordPress plugin directory
You can install the Pressidium Performance Plugin directly from the WordPress plugin directory.
To install it:
- Log in to your WordPress admin dashboard.
- Go to Plugins > Add New Plugin.
- In the search field, enter
Pressidium Performance. - Find Pressidium Performance in the results.
- Click Install Now.
WordPress downloads and installs the plugin automatically.
Do not leave the page until the installation finishes.
Activate the plugin
After installation completes, click Activate.
Once activated, the plugin adds a new Performance menu item to the WordPress admin sidebar.
Use this menu to access the plugin settings, review optimization status, configure performance features, and monitor background processes.
The plugin settings
To open the plugin settings, click Performance in the left sidebar.
The Overview tab shows the plugin’s current optimization status and gives you access to the main performance areas.
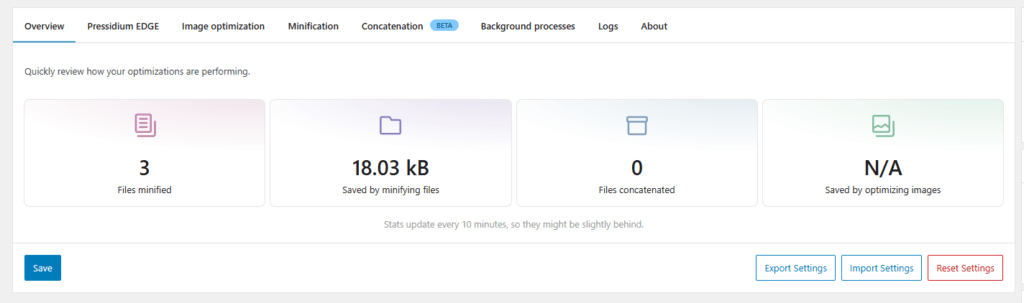
From there, you can review:
- The Pressidium EDGE tab
- Image optimization
- CSS & JavaScript minification
- CSS and JavaScript concatenation
- Background processes
- Logs
Pressidium EDGE tab
If your site uses the standalone Pressidium EDGE service, the Pressidium EDGE tab shows the connection status between the Performance Plugin and EDGE, and lets you purge its cache when connected.
To connect the plugin to your EDGE site or troubleshoot the connection, follow Performance Plugin EDGE integration.
Performance settings
Start with lower-risk optimizations first, then test the site after each change.
A recommended order is:
- Review image optimization settings and enable automatic image optimization if it matches your workflow.
- Review CSS and JavaScript minification.
- Enable minification and test key pages.
- Review concatenation only if you need additional request reduction.
- Check the Background Processes tab after enabling optimization tasks.
Testing recommendations
Enable one optimization area at a time and test the site after each change.
Check important pages such as:
- Homepage
- Product pages
- Checkout or forms
- Login or account pages
- Pages with sliders, popups, maps, or custom scripts
Pay extra attention when enabling:
- JavaScript minification
- CSS minification
- CSS concatenation
- JavaScript concatenation
If a layout or interactive element breaks, disable the most recent optimization and add exclusions for the affected file when needed.
Common issues and solutions
The Performance menu does not appear
Check that the plugin is activated from Plugins > Installed Plugins.
If the menu is still missing, refresh the WordPress admin dashboard and confirm your user account has administrator permissions.
An optimization causes a display or functionality issue
Disable the most recent optimization you enabled and test the page again.
If the issue is related to a specific CSS or JavaScript file, add that file to the relevant exclusion list.
Background processing appears delayed
Open the Background Processes tab and check whether tasks are queued, running, paused, or completed.
Large image libraries or many asset files can take longer to process.
Need help?
If an issue persists, contact Support and include:
- Site URL
- WordPress version
- Plugin version
- Optimization setting that caused the issue
- Screenshot of the issue
- Any relevant browser console errors
For plugin bugs or technical feedback, you can also use the official WordPress.org support forum or GitHub Issues.
Where to go next
After you install and activate the Pressidium Performance Plugin, connect it to EDGE and review the available settings.
- To enable or adjust plugin options, follow Configure Performance Plugin settings.
- To enable image optimization, follow Automatic image optimization via Performance Plugin.
- To troubleshoot installation or connection issues, review Performance Plugin troubleshooting.
Was this article helpful?