

Account Settings & Profile
To review and change your personal settings:
- Log in to the Pressidium EDGE Dashboard.
- Click the avatar icon at the bottom of the left sidebar.
- Click Personal Settings.
The page displays 3 sections:
- Profile Settings
- Security
- SSH Keys
Profile Settings
The General section shows your First name, Last name, Email Address, and Phone.
- To edit these fields, click Edit.
- Update the fields you need to change.
- Save your changes.
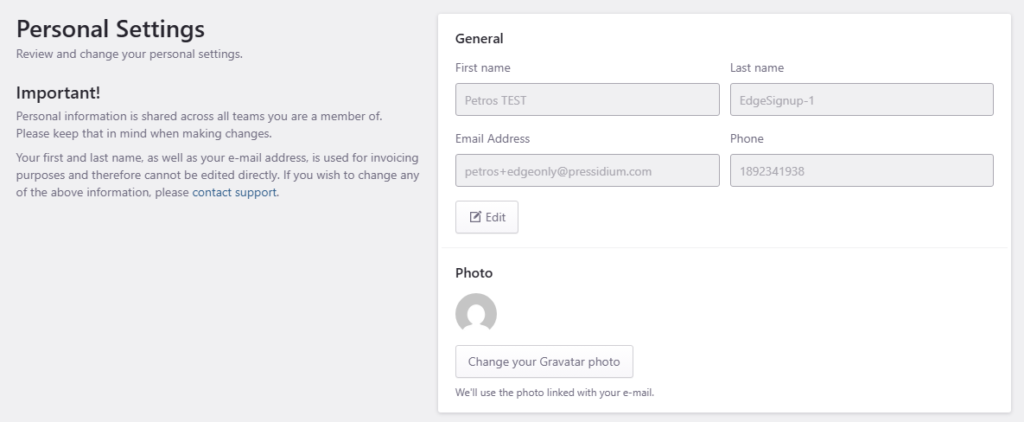
Note: Name and email fields used for invoicing cannot be edited directly. Contact Support if you need those updated.
Update your Profile Photo
Your profile photo is managed through Gravatar, linked to your email address.
- In the Photo section, click Change your Gravatar photo.
- Enter your Gravatar email to change your photo.
- The updated photo appears in Pressidium EDGE as long as the email entered is linked to an existing Gravatar profile.
Security
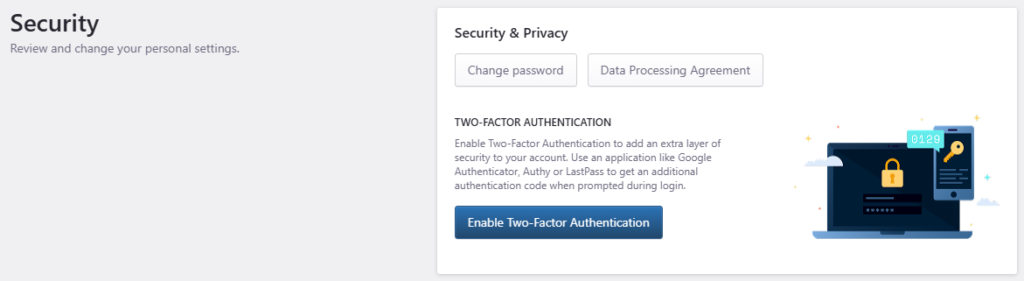
Here you can update your security and privacy settings
Change your Password
Click Change password and use the pop-up window to update the password for your account.
- In Current password, enter your existing account password.
- In New password, enter your new password.
- In Confirm new password, enter the same new password again.
- Click Set Password.
- Verify that your old password no longer works and your new password signs you in.
The Set Password button becomes available when the new password meets the requirements and both password fields match.
View your Data Processing Agreement
The Data Processing Agreement defines how personal data is processed between Pressidium and the account owner.
- Click Data Processing Agreement.
- Review the agreement or Download PDF.
You may need to review and sign this agreement if your organization is subject to GDPR or other privacy requirements.
Enable Two-Factor Authentication
Two-Factor Authentication adds an extra layer of security to your account. After it is enabled, you will need both your password and a verification code from an authenticator app when signing in.
You can use an authenticator app such as Google Authenticator, Authy, or LastPass.
For full setup instructions, see our dedicated guide: Securing Your Account Using Two-Factor Authentication.
Generate new recovery keys
If you lose access to your authenticator app, recovery keys let you sign in.
- In Security & Privacy, click Generate new Recovery keys.
- Store the new keys in a safe location.
Warning: Generating new recovery keys invalidates any previously generated keys.
SSH Keys
Use SSH keys for secure access to services associated with your account.

Add an SSH key
- In the SSH Keys section, click Add SSH Key.
- Paste your public key and give it a recognizable name.
- Save the key.
- Verify that the SSH keys you added appear in the SSH Keys section.
Remove an SSH key
- In the SSH Keys section, locate the key you want to remove.
- Click the remove or delete action next to it.
- Confirm the removal.
If something fails
- Cannot edit name or email: These fields are locked for invoicing. Contact Support with your account email and the correction you need.
- Password change fails: Confirm your current password is correct and the new password meets the policy requirements shown on screen.
- Two-Factor Authentication setup fails: Verify your authenticator app clock is synchronised and retry.
- SSH key not accepted: Confirm you are pasting a valid public key (not the private key) and that it is not already in use.
If the issue persists, contact Support with your account email, a timestamp, and a screenshot of the error state.
Was this article helpful?