

Add a domain or subdomain and update DNS records (Pressidium EDGE)
This guide explains how to add a domain, such as example.com, or a subdomain, such as shop.example.com, to a website on Pressidium’s EDGE NextGen Global Network.
Domains and subdomains use the same Dashboard workflow. The guided setup displays the DNS records required for the address you enter.
There are two things that you need to do to have your website and domain fully operational:
- Map your domain to your WordPress website.
- Update your DNS records in your DNS provider’s settings to verify domain ownership and setup traffic flow.
Prerequisites
- Adding a domain name involves updating DNS records. We recommend reading our 2 minute guide to DNS to get familiar with how the DNS system works.
- You’ll need the login credentials for your DNS provider—the service that manages your domain’s DNS records. This is typically the company where you registered your domain (like GoDaddy or Namecheap), but it could also be a separate DNS hosting service.
- Before making any domain name updates or DNS changes, we recommend lowering the TTL (Time to Live) of your existing records. This can help DNS changes propagate more quickly. You can increase the TTL back to your provider’s default afterward.
Step 1: Add your domain or subdomain
From the Domains screen, click the Add Domain button to navigate to our guided step process.
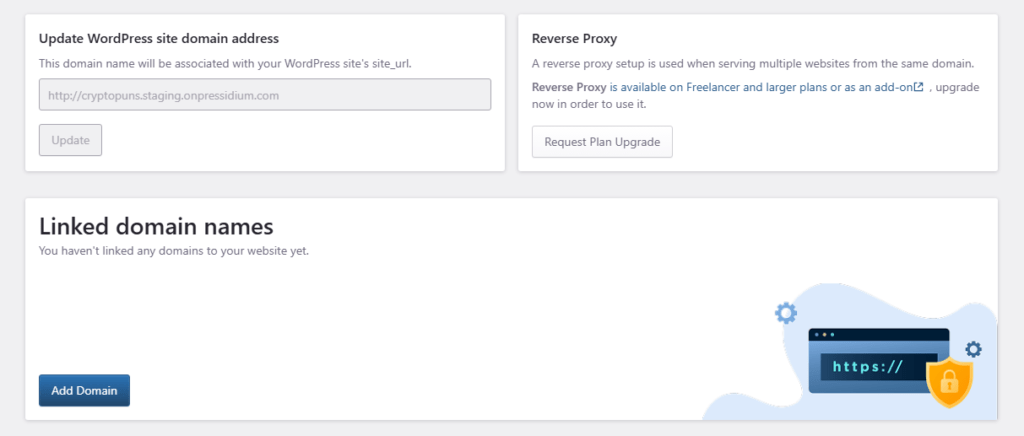
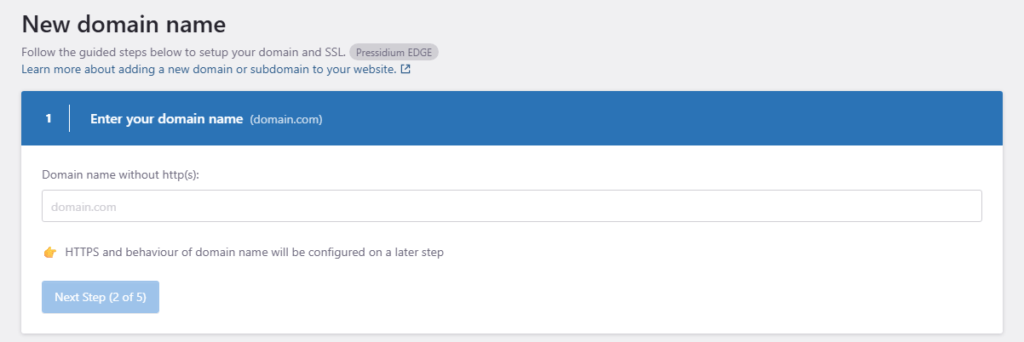
Enter your domain name or subdomain name:
Carefully type the full domain name you wish to add. For example,
mydomain.comorsubdomain.mydomain.com.
Proceed to step 2 to configure your domain’s Redirect behavior by clicking the Step 2 of 4 button.
Step 2: Configure redirect behavior
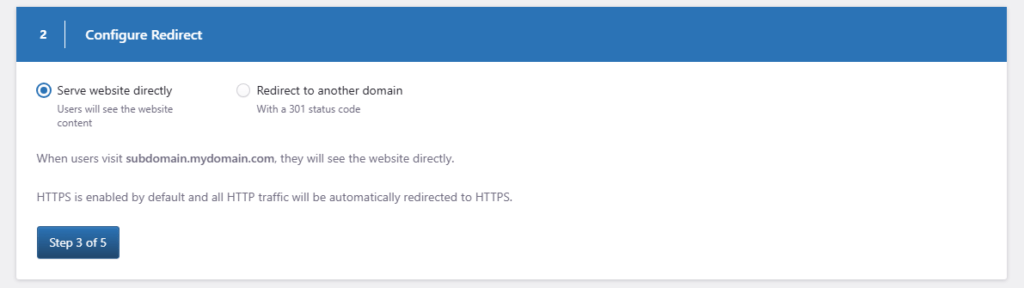
In this step you can configure what visitors see when accessing the domain.
- Serve website directly: Select see the website directly if you want your primary domain (
yourdomain.com) to directly serve the content of your WordPress website. This is the most common setting for a primary domain. - Redirect to another domain: Select get redirected to another domain if you want visitors who type in this domain to be automatically redirected to a different website address. You’ll need to enter the target domain name in the provided field (note: only already added domains are available/visible in the list). This can be useful to setup a 301 permanent redirect to another domain that you have already added in your account (e.g redirecting the
wwwversion of a domain to thenon-wwwversion), temporary redirects, domain aliases, or consolidating multiple domains.
Step 3: Configure HTTPS / SSL
To secure your domain you can provision a free certificate issued by our platform or use an existing SSL certificate (you can use one you have already uploaded or upload a new one in the related dialog).
- Free by Pressidium: To automatically generate and import a Pressidium managed, free SSL certificate select Free by Pressidium. Pressidium managed certificates are automatically provisioned and renewed by our platform, greatly simplifying the process for you.
- Custom from 3rd party provider: To import and use an existing SSL certificate select Custom from 3rd party provider. Choose this if you have purchased an SSL certificate from another vendor (like Comodo, DigiCert, etc.) and need to upload its details (certificate, private key, and possibly intermediate certificates). This is a more advanced option. You can either select a certificate already imported, import a new certificate by entering the certificate details (Private Key, Certificate, Certificate Bundle) or generate a CSR.
Click `Add domain` to start the process of provisioning the domain to your account. Once the process is complete, the DNS records required to finalize the setup will be displayed in steps 4 and 5.
Step 4: Update DNS Records – Verify domain ownership
If you opted to use a free SSL certificate managed by our platform you will need to add DNS records in order for our systems to verify your domain ownership and issue / install an SSL certificate. Depending on the type of domain (or subdomain) you may be presented with one or more DNS records to add.
Login to your DNS provider’s control panel and add the new CNAME records. Below is a list of resources for the most popular DNS services:
- Cloudflare: How do I add A records? (Make sure to select the DNS Only option/mode when adding records)
- BlueHost : How to Modify Your DNS Records
- NameCheap : How do I set up host records for a domain?
- GoDaddy : Manage DNS records
If you are using Cloudflare as your DNS provider please make sure to use DNS only mode (proxy off) when adding DNS records.
After configuring DNS, click “Verify DNS”, our platform will check if the DNS record has propagated correctly. DNS propagation can take some time (from a few minutes to up to 24-48 hours in rare cases, you can check for yourself the status by using an online service such as www.whatsmydns.net), so if the verification fails immediately, wait a while and try again.
You can select “Skip”, if you want to add the DNS records later. However, your SSL certificate won’t be issued, and your domain might not work correctly until the records are in place. You can resume the process by clicking on “Verify SSL” in the domain action menu.
Step 5: Update DNS Records – Route traffic to Pressidium
To switch your domain traffic to our infrastructure you will need to add a set of DNS records to point your domain to. Depending on the type of domain (or subdomain) you may be presented with one or more DNS record sets to add. You need to setup one of the displayed options.
Option A: CNAME record(s)
This is recommended if your provider supports adding CNAME records in an “apex” (“naked” or “root”) domain. Most popular DNS providers support this option. If your provider does not support this, please refer to Option B below for setting up A/AAAA records.
Option B: A/AAAA record(s)
Add the A(IPv4) and AAAA (IPv6) records displayed. Use this record set if your provider doesn’t support CNAME records in an “apex” (“naked”) domain. It is strongly recommended to add all entries (adding only a subset of the DNS records might prevent our load-balancing and fail-over mechanism from working correctly).
Once you have added the CNAME or A/AAAA records at your DNS provider, click “Verify DNS”, our platform will check if the DNS records are properly configured and pointing to our service. DNS propagation can take some time (from a few minutes to up to 24-48 hours in rare cases, you can check for yourself the status by using an online service such as www.whatsmydns.net), so if the verification check fails immediately, wait a while and try again.
If the DNS verification is successful, your domain should now be correctly associated with our platform.
You can select “Skip”, if you want to add the DNS records later. However the domain will not be able to serve traffic from our platform until this step is completed and DNS is properly configured. You can resume the process by clicking on “Configure DNS” in the domain action menu.
Troubleshooting Tips
- Typos: Double-check for any typos when entering DNS records. Even a small mistake can prevent your domain from working correctly.
- Propagation Time: Be patient! DNS changes can take some time to propagate across the internet. If the verification fails immediately, wait an hour or two and try again.
- Conflicting Records: Ensure you remove any conflicting DNS records (especially A records when using CNAME for the main domain and any subdomains).
- DNS Provider Instructions: Always refer to the specific instructions provided by your domain registrar or DNS hosting provider on how to add or edit DNS records. Their interface might look slightly different.
- Contact Support: If you encounter persistent issues, don’t hesitate to contact our support team for help.
Need help?
Contact Pressidium Support if:
- DNS verification still fails after the records have propagated.
- The domain does not show as Connected after you have added the required DNS records.
- SSL remains pending after successful domain verification.
- The domain points to the wrong website or becomes inaccessible after the DNS change.
- The domain setup process does not complete.
Include:
- Website name
- Environment: Production or Staging
- Domain or subdomain
- DNS provider
- Current DNS records
- A screenshot of the domain status in the Pressidium Dashboard
- The approximate time you made the latest DNS change
Where to go next
- Manage your domains to review connection, HTTPS, DNS, and redirect status for your domains.
- Check whether your DNS changes have propagated if the Dashboard does not yet detect your new records.
- Add a domain redirect if you want one domain, such as
www.example.com, to redirect to another associated domain.
Was this article helpful?