

Manage Cache
The Cache Management page lets you clear cached content for a website. You can clear individual cache types, clear all active caches, or purge specific URL paths without clearing the entire cache.
Accessing Cache Management page
- Log in to the Pressidium Dashboard.
- Select the website you want to manage.
- Go to Performance -> Cache.
Included Sections
- Dynamic Page Cache – shows Page Cache status and provides a clear action
- Static Assets Cache – shows static assets cache status and provides a clear action
- All Cache – clears all active caches for the website
- Purge URLs from Cache – removes selected paths from Page Cache
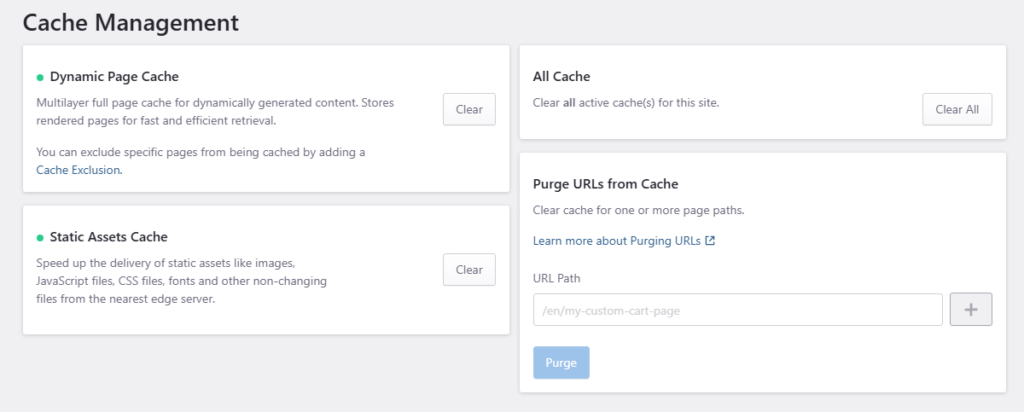
Page Cache
Page caching is a key feature in our platform, and it significantly enhances website performance and speed by storing and serving a copy of the full page response generated by a website from memory (or a super fast SSD).
At Pressidium, full page caching is implemented in at least two caching layers, “hot” and “warm“. These layers are part of our adaptive cache engine and work in tandem based on your website’s caching profile to ensure optimal website performance.
- Hot cache serves data from memory for quick retrieval and reduced latency.
- Warm Cache serves data that reside in state-of-the-art super fast SSD disks and is used for data that is accessed less frequently but still requires rapid access when needed.
Page cache provides significant benefits:
- Faster Page Loading: Cached pages load significantly faster because they eliminate the need to re-run complex PHP scripts and database queries for every visitor.
- Reduced Infrastructure Load: Since cached pages are served without the underlying infrastructure having to regenerate them, it reduces the server’s processing load, allowing it to handle more concurrent visitors.
- Improved Scalability: Our caching engine enables websites to handle traffic spikes and high visitor loads transparently and more efficiently.
- Better User Experience: Faster loading times lead to improved user satisfaction and reduced bounce rates.
How to clear Dynamic Page Cache
Our page caching mechanism is deeply integrated with WordPress and, by default, will automatically clear the page cache for several URLs (e.g. homepage, single post/page URL, page archives, etc.) when a post or page is created or updated.
But, there are occasions when you may find it necessary to manually clear the cache, such as when you update content or make changes to your website, either through the WordPress admin interface or by updating files via SFTP.
To clear page cache only:
- Navigate to Cache -> Cache Management screen.
- Locate the Dynamic Page Cache section.
- Click Clear and again Clear on the confirmation dialog box.
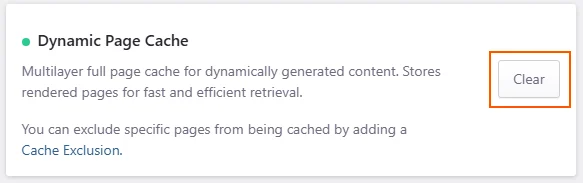
A background job will be started to clear the website’s full page cache.
Static Assets Cache
Static assets are served directly from the edge location, closest to the website visitor, by default, to improve overall delivery speed and latency.
However, it is sometimes useful to clear this cache, particularly when you modify or replace static files (CSS files, JavaScript files, media files, etc.) on your website.
How to clear the Static Assets cache
- Navigate to Performance -> Cache screen.
- Locate the Static Assets Cache section.
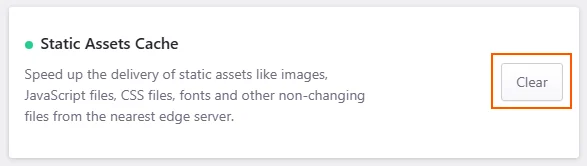
Click Clear and confirm the action to start a background job to clear the CDN cache.
All Cache
You can clear all caches in several ways.
1. Using the Cache page section
To clear all caches (this includes the full page cache):
- Navigate to Performance -> Cache screen.
- Locate the All Cache section.
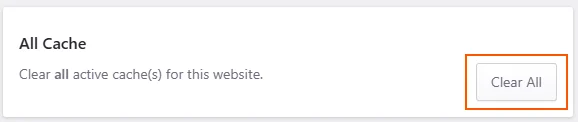
Click Clear All and again Clear on the confirmation dialog box.
A background operation will start. When it is complete, a notification appears in the sidebar.
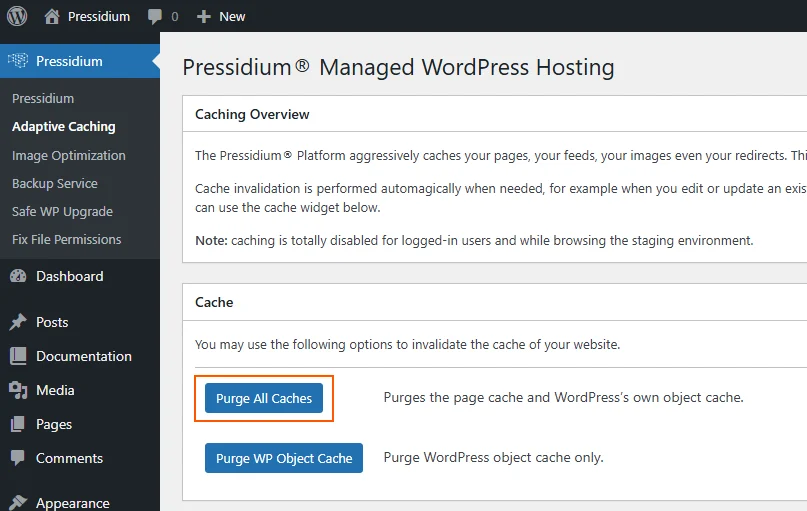
2. Using the WordPress Admin Dashboard
- Login to your WordPress admin dashboard.
- Click on the Pressidium sidebar menu to open up the Pressidium platform settings.
- Click the Caching tab to go to the Cache settings screen.
- Click the Purge All Caches button to clear the page cache and WordPress own object cache.
Expected outcome
The existing cached versions of your site’s content are removed.
New requests generate fresh responses, which are then cached again according to your site’s cache configuration.
Verification
After the cache purge is complete:
- Open the affected page in a private or incognito browser window.
- Reload the page.
- Confirm that the latest content or design changes are visible.
When using the Pressidium Dashboard, also confirm that the cache-clearing operation shows as completed in the notification panel.
Purge URLs from Page Cache
In this section, you can select to clear one or more URLs from the page cache. This is useful when you are making changes to a specific set of pages or files and don’t need to clear the whole cache.
- Navigate to Cache -> Cache Management screen.
- Locate the Purge URLs from Cache section.
Insert the URL path you want to exclude in the input box and click Purge.
Example: /en/my-custom-cart-page
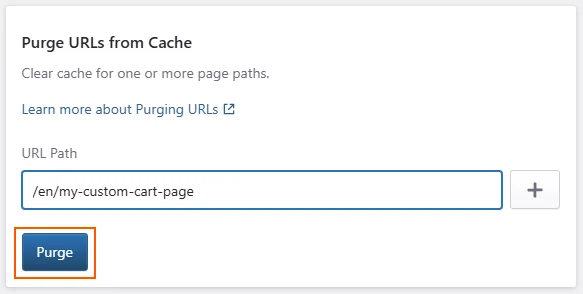
A background job will start to clear the page cache for the specific URLs. You will receive a Dashboard notification as soon as the process is finished.
You can also use the + button when you need to purge more than one URL.
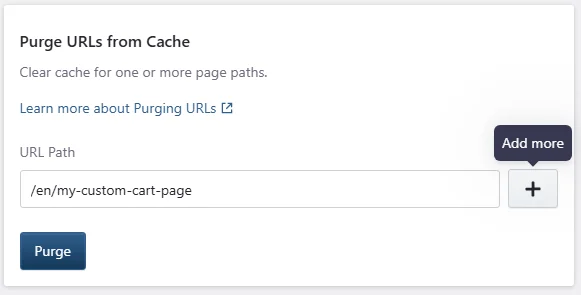
You can add up to 3 URLs at a time.
Common issues and solutions
Updated content is still not visible
Check whether:
- The correct cache type was cleared.
- The affected URL was entered correctly.
- Static files also require the Static Assets Cache to be cleared.
- Your browser is displaying a locally cached copy.
Test the affected page in a private or incognito browser window.
A purged URL still shows old content
Confirm that the path begins with / and matches the affected page.
If the change includes CSS, JavaScript, images, fonts, or other static files, also clear the Static Assets Cache.
The cache-clearing operation does not complete
Check the notification panel for the operation status.
If the operation remains pending or fails, contact Support with the affected domain, cache action, and approximate time the operation was started.
Need help?
Contact Support if:
- A cache-clearing operation fails or remains pending.
- Updated content is still not visible after clearing the applicable caches.
- You are unsure which cache type to clear.
- Purging a specific URL does not produce the expected result.
Include:
- The affected domain
- The affected URL
- The cache action you used
- The expected result
- The actual result
- The approximate timestamp and timezone
- A screenshot of the operation or notification
Where to go next
After managing cache settings, verify the result or continue with more specific cache controls.
- Check cache outcomes in Cache analytics.
- Exclude specific URLs or cookies through Cache URL and cookie exclusions.
- Compare cache changes against site speed in Performance overview.
- Resolve unexpected cache results with Cache not working.
Was this article helpful?