

Point your domain traffic to Pressidium EDGE
After verifying domain ownership, update your DNS records so that requests for your website are routed through Pressidium EDGE.
This step makes EDGE the first point of contact for incoming website traffic before requests reach your origin server.
Prerequisites
Before continuing, make sure:
- The website has been added to Pressidium EDGE.
- You have access to the domain’s DNS provider.
- You have permission to add, update, and remove DNS records.
- Domain ownership has been verified.
If you have not completed domain verification, follow Verify your domain for Pressidium EDGE first.
To see how to route your domain traffic through EDGE in the full setup walkthrough, watch the Step 6 section of the following video tutorial:
If your domain is behind a proxy, like Cloudflare, watch this video tutorial instead:
Open the traffic-routing details
You can access the required DNS records in two ways.
During initial website setup
If you are still using the setup wizard, continue to the Point Traffic step.
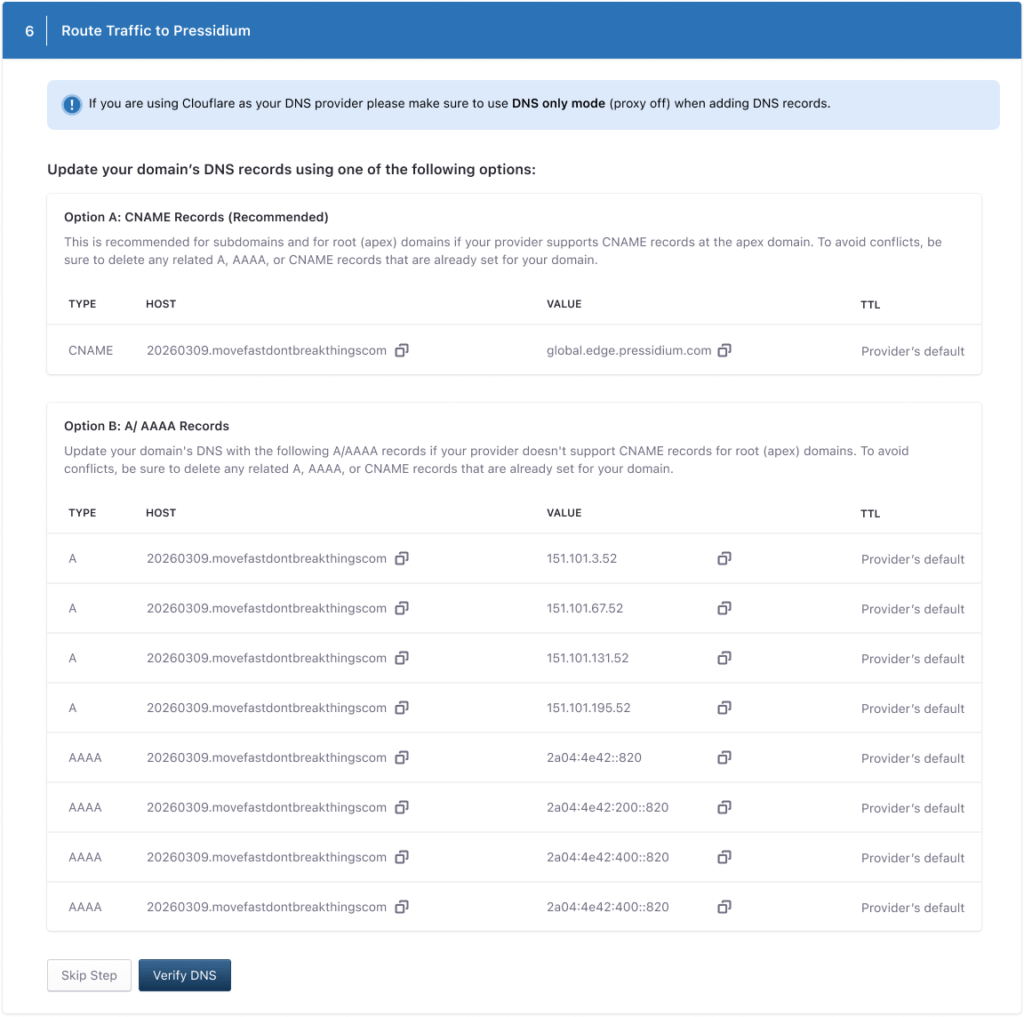
From the Domains page
If you skipped traffic routing during setup or need to return to it later:
- Go to WordPress > Domains.
- Open Configure > DNS Details.
- Select Point Domain / Traffic.
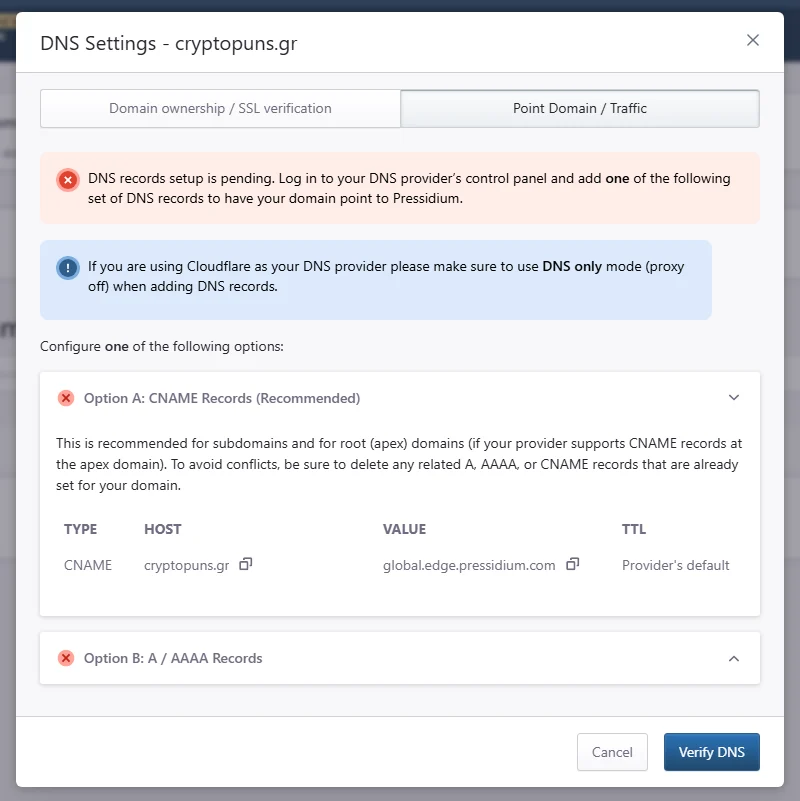
Both interfaces provide the DNS records required to route traffic through EDGE.
Choose a routing method
EDGE provides two methods for pointing your domain:
- CNAME Records (Recommended)
- A / AAAA Records
Use only one method for the same host. Do not configure both the CNAME and A/AAAA methods for the same hostname.
Option A: Use CNAME record
This is recommended if your provider supports adding CNAME records in an “apex” (“naked” or “root”) domain. Most popular DNS providers support this option. If your provider does not support this, please refer to Option B below for setting up A/AAAA records.
- Expand CNAME Records (Recommended).
- Copy the record displayed in the Pressidium Dashboard.
- Open the domain’s DNS zone at your DNS provider.
- Delete any conflicting
A,AAAA, orCNAMErecords for the same host. - Add the CNAME record using the exact Host, Value, and TTL displayed.
- Save the record.
- Return to the Pressidium Dashboard.
- Click Verify DNS.
Option B: Use A and AAAA records
Use this record set if your provider doesn’t support CNAME records in an “apex” (“naked”) domain.
- Expand A / AAAA Records.
- Open the domain’s DNS zone at your DNS provider.
- Delete any conflicting
A,AAAA, orCNAMErecords for the same host. - Add every
A(IPv4) record displayed in the Pressidium Dashboard. - Add every
AAAA(IPv6) record displayed in the Dashboard. - Save the records.
Then return to the Pressidium Dashboard and click Verify DNS. Our platform will check if the DNS records are properly configured and pointing to our service. DNS propagation can take some time (from a few minutes to up to 24-48 hours in rare cases, you can check for yourself the status by using an online service such as www.whatsmydns.net), so if the verification check fails immediately, wait a while and try again.
DNS verification success
When EDGE successfully verifies the routing configuration, the Dashboard displays a confirmation.

This confirms that the traffic-routing DNS records have been detected and point to EDGE.
If DNS verification fails
If EDGE cannot verify the routing configuration, the Dashboard displays an error.

DNS changes may need time to propagate. You can check your DNS propagation progress.
If verification still fails, check that:
- The record type matches the value shown in the Dashboard.
- The Host/Name is entered correctly.
- The Value/Target exactly matches the value provided by EDGE.
- There are no conflicting
A,AAAA, orCNAMErecords for the same host. - The DNS records were added at the provider currently authoritative for the domain.
After correcting the DNS records or allowing time for propagation, return to the Dashboard and click Verify DNS again.
Confirm the site works through EDGE
After DNS verification succeeds, test the website before considering traffic routing complete.
Check that:
- Domain ownership and traffic routing show as complete in the Pressidium Dashboard.
- The website loads over
https://without browser warnings. - Public pages load correctly.
- Images, CSS, JavaScript, and fonts load correctly.
- WordPress admin remains accessible.
- Important dynamic pages, such as login, cart, checkout, account, membership, or LMS pages, behave correctly.
- Traffic appears in the site’s traffic or analytics screens after requests reach EDGE.
Complete traffic routing later
If you skipped this step during initial setup, you can return to it at any time.
Go to WordPress > Domains > Configure > DNS Details, then open Point Domain / Traffic and complete the DNS changes described above.
Need help?
If EDGE still cannot verify your DNS configuration after the records have propagated and you have confirmed that the values are correct, contact Pressidium Support.
Include:
- The affected domain
- Your DNS provider
- The routing method you used
- The DNS records you configured
- A screenshot of the verification status
Where to go next
- To continue the initial setup, return to Adding a WordPress site to EDGE and complete the WordPress integration step.
- To confirm the full setup is working correctly, follow Verify Your Setup (Checklist).
- To understand how DNS changes propagate, see DNS propagation explained.
- If DNS verification continues to fail, see DNS configuration problems.
This cleanly absorbs everything removed from Step 6 of the onboarding article while supporting both the wizard and Domains > DNS Details routes.
Was this article helpful?