

Adding a WordPress site to EDGE
In this guide, you will learn how to
- Add a WordPress site to Pressidium EDGE
- Configure its origin and SSL settings
- Verify domain ownership
- Route traffic through EDGE
- Connect the Pressidium Performance Plugin
Prerequisites
- Adding a domain name involves updating DNS records. We recommend reading our 2-minute guide to DNS to get familiar with how the DNS system works.
- You’ll need the login credentials for your DNS provider—the service that manages your domain’s DNS records. This is typically the company where you registered your domain (like GoDaddy or Namecheap), but it could also be a separate DNS hosting service.
Watch the setup walkthrough
This video walks through the complete 7-step process for adding a WordPress site to Pressidium EDGE, including domain verification, traffic routing, and WordPress integration.
If your domain is proxied behind a service (like Cloudflare), watch this video instead
The written steps below include the full instructions, additional guidance, and troubleshooting details.
Step 1: Add your domain
Once you login to your dashboard and land on the homepage, click the New Website button to start the wizard.
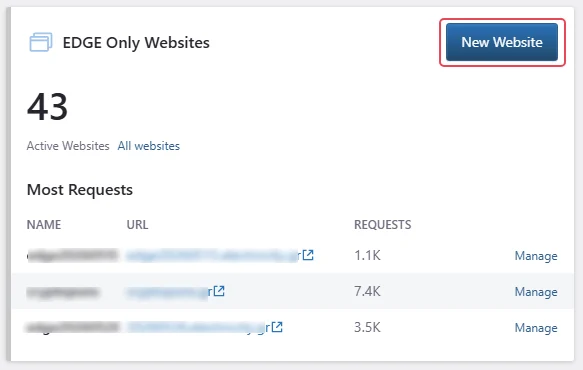
The setup wizard opens and guides you through the required steps.
Add website details
The first step is to enter the website name and domain.
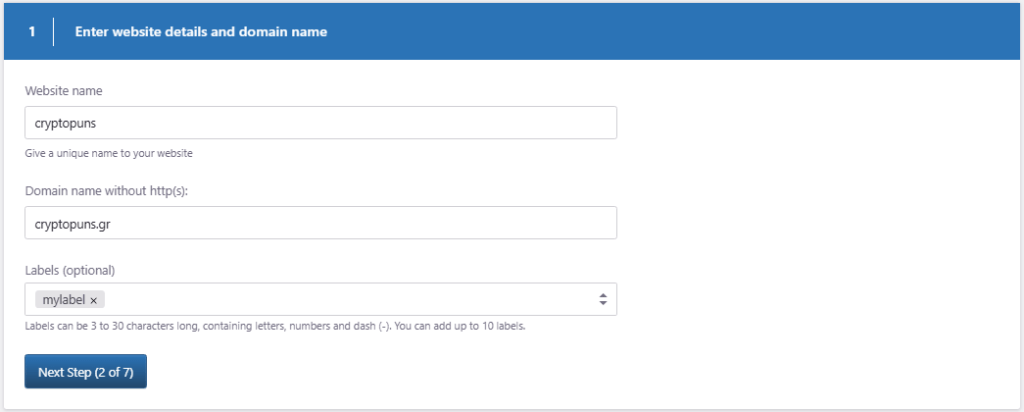
- In Website name, enter a unique name for the website.
- In Domain name without http(s), carefully enter the domain without
http://orhttps://. For example,mydomain.comorsubdomain.mydomain.com. - Optional: Add labels to help organize the website.
- Click Next Step.
Use a clear website name that helps you recognize the site later in the dashboard.
Step 2: Configure the origin
The origin is the server where your website is currently hosted. EDGE uses this origin when it needs to fetch uncached content or forward requests.
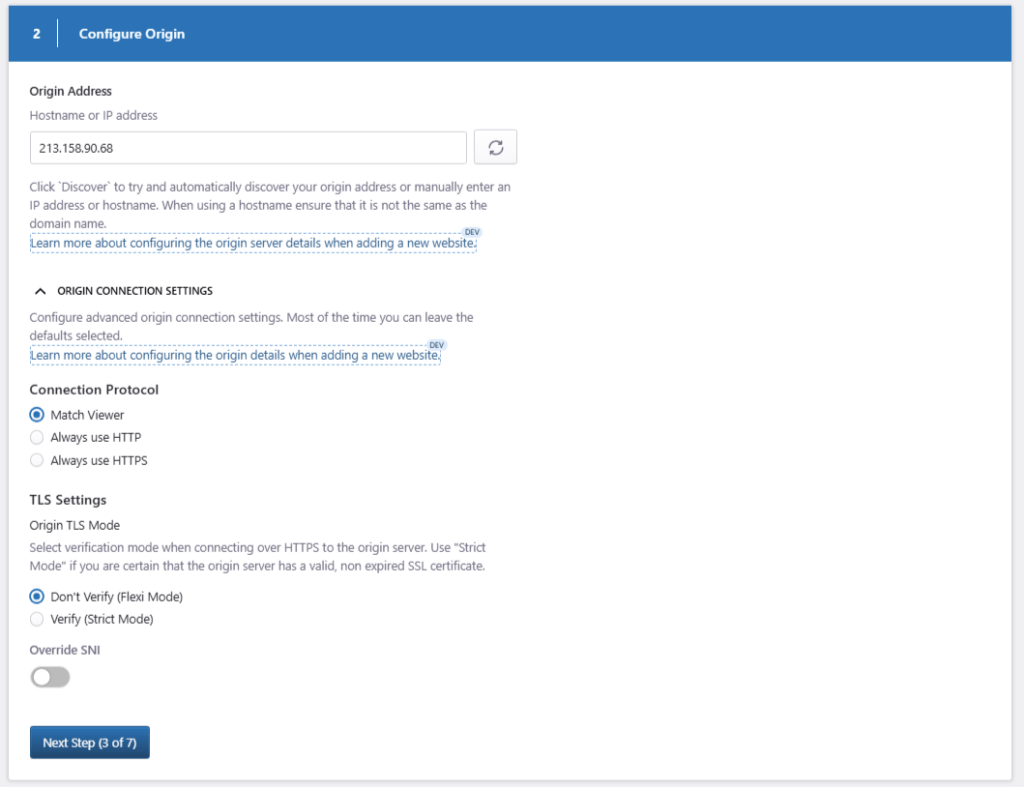
Origin address
In the Origin Address section, enter the hostname or IP address of the server where your website is currently hosted. You can also use the discover icon to try automatic origin detection.
If you’re unsure which address to use, contact your hosting provider.
Origin connection settings
Most websites can keep the default origin connection settings.
But if you need to adjust advanced connection behavior, here are the available Connection Protocol options:
- Match Viewer: EDGE connects to the origin using the same protocol requested by the visitor.
- Always use HTTP: EDGE always connects to the origin over HTTP.
- Always use HTTPS: EDGE always connects to the origin over HTTPS.
The available Origin TLS Mode options are:
- Don’t Verify (Flexi Mode): EDGE connects over HTTPS without validating the origin certificate.
- Verify (Strict Mode): EDGE validates the origin certificate when connecting over HTTPS.
Use Strict Mode only when the origin server has a valid, non-expired SSL certificate.
You can also enable Override SNI when your origin requires a specific Server Name Indication value during TLS negotiation.
When done with the settings, click Next Step.
Step 3: Configure redirect behavior
At this step, the domain is configured to serve the WordPress website directly.
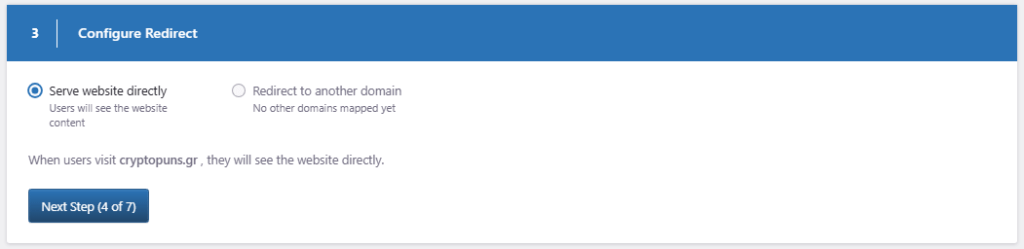
- Leave Serve website directly selected.
- Click Next Step.
The Redirect to another domain option is not available when creating the website because no other domain has been mapped to it yet.
Step 4: Configure SSL
The SSL step controls how HTTPS is handled for the website.
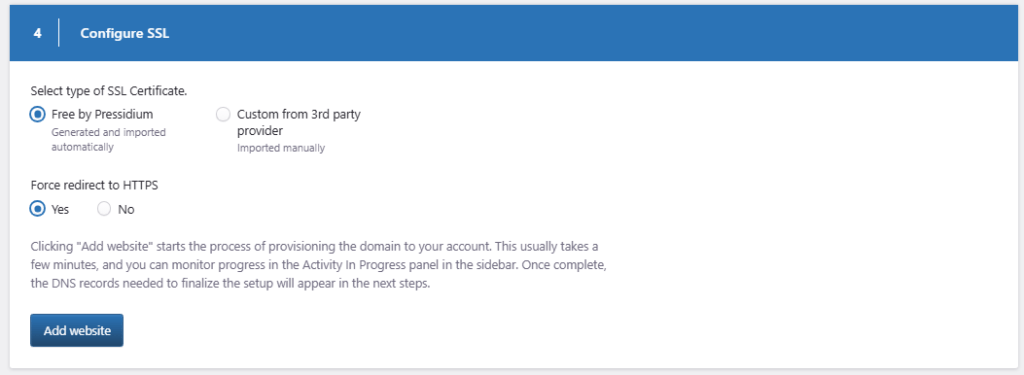
- Choose the SSL certificate type:
- Free by Pressidium: Pressidium provisions and manages the certificate for you, including renewal.
- Custom from a 3rd-party provider: Use this option if you want to provide your own SSL certificate instead of using a Pressidium-managed certificate.
- Choose whether to force redirect to HTTPS.
- Click Add website.
After you click Add website, Pressidium starts provisioning the domain in your account. This usually takes a few minutes.
Step 5: Verify the domain
If you selected Free by Pressidium and the domain verification step appears, verify your domain ownership before routing traffic through EDGE.
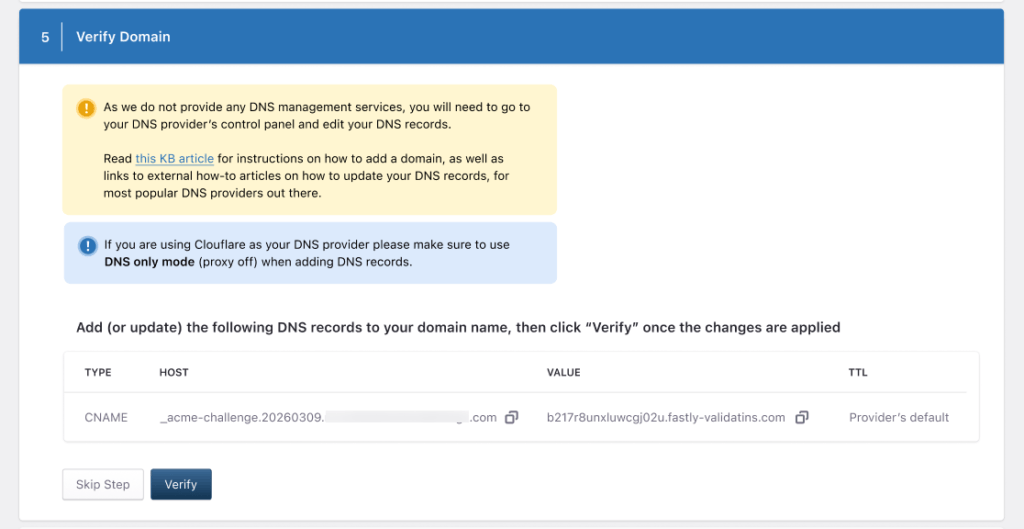
Follow Verify your domain for Pressidium EDGE to add the required DNS verification record and confirm ownership.
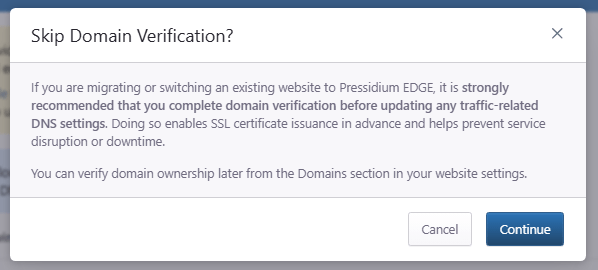
We strongly recommend that you complete Step 5 and verify domain ownership before updating any traffic-related DNS settings.
But if you need to continue without verifying the domain, click Skip Step. You can return and complete verification later.
Step 6: Route traffic to Pressidium EDGE
After domain ownership verification is complete, when required, update your DNS records so that website traffic passes through Pressidium EDGE.
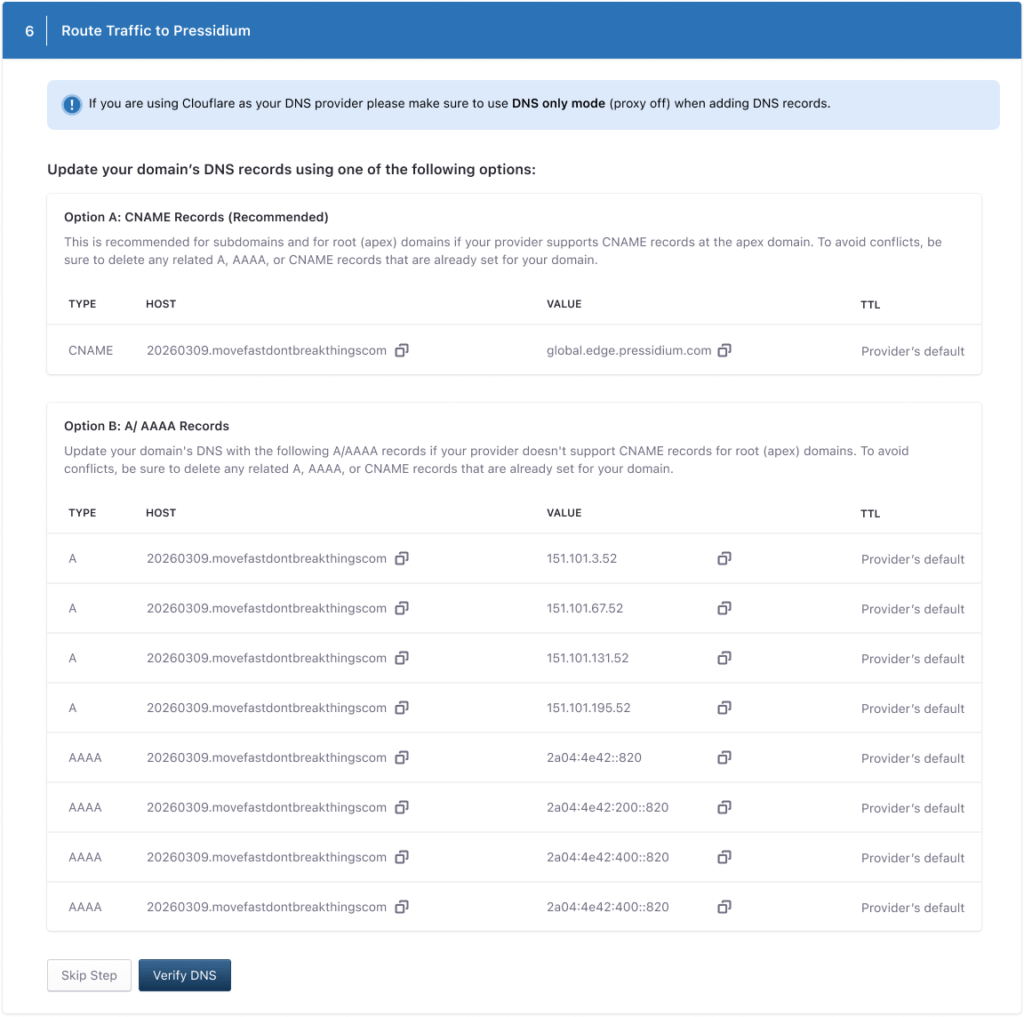
Follow Point your domain traffic to Pressidium EDGE to choose the correct method, update your DNS records, and verify that traffic is reaching EDGE.
If you skip this step, you can complete traffic routing later from the Pressidium Dashboard.
Step 7: Integrate with WordPress
The final step connects your WordPress site to Pressidium EDGE through the Pressidium Performance Plugin.
This enables automatic cache management between WordPress and the EDGE platform and unlocks additional EDGE cache-management controls.
Before continuing, follow the instructions to install the Pressidium Performance Plugin.
Connect the plugin to EDGE
Step 1: Get the Client ID and Client Secret
Use the credentials shown in the Integrate with WordPress step.
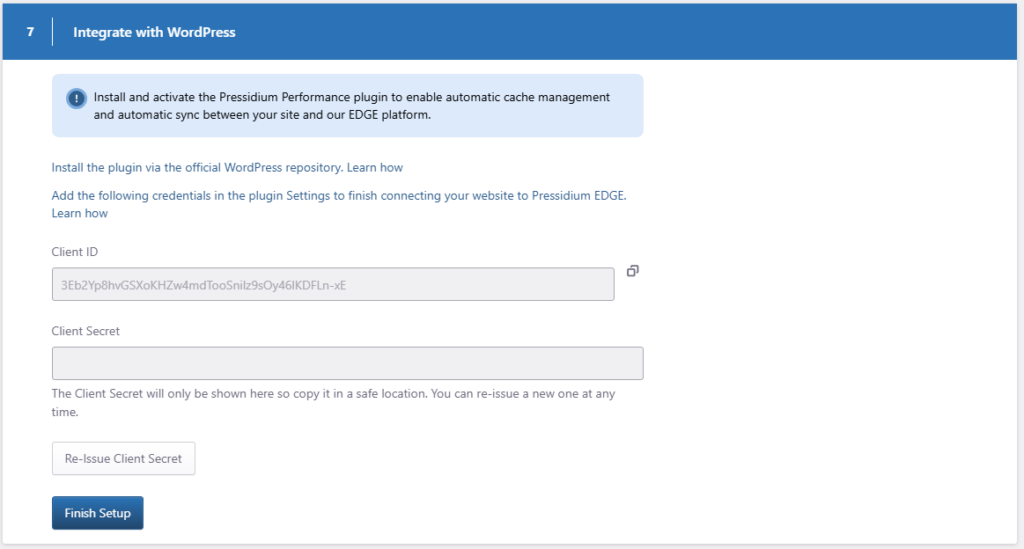
You can also Re-issue the Client Secret. This may be needed if:
- The original secret was not copied.
- The secret was exposed.
- You want to rotate the credentials.
- The WordPress plugin connection needs to be reset.
Step 2: Enter the credentials in the plugin’s settings
Click Performance in the menu to open the Performance Plugin settings, then open the Pressidium EDGE tab.
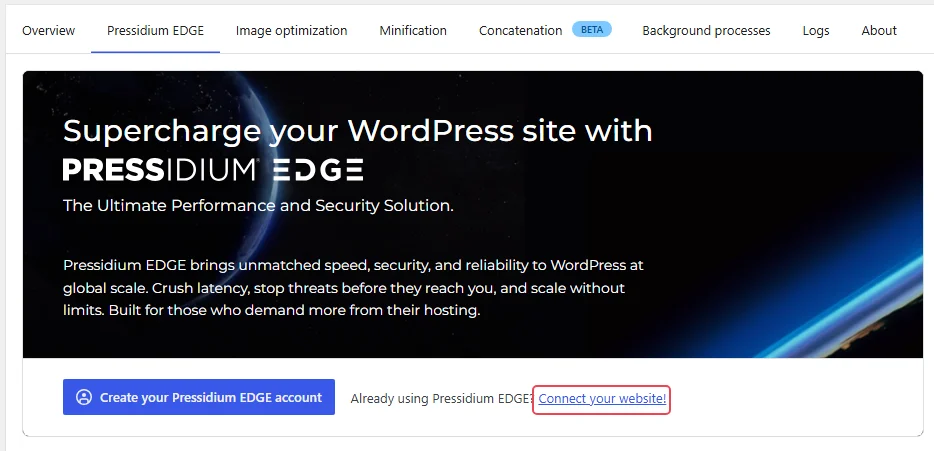
Click Connect your website to open the popup window and paste the Client ID and Client Secret.
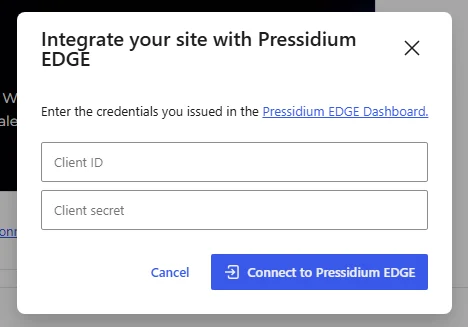
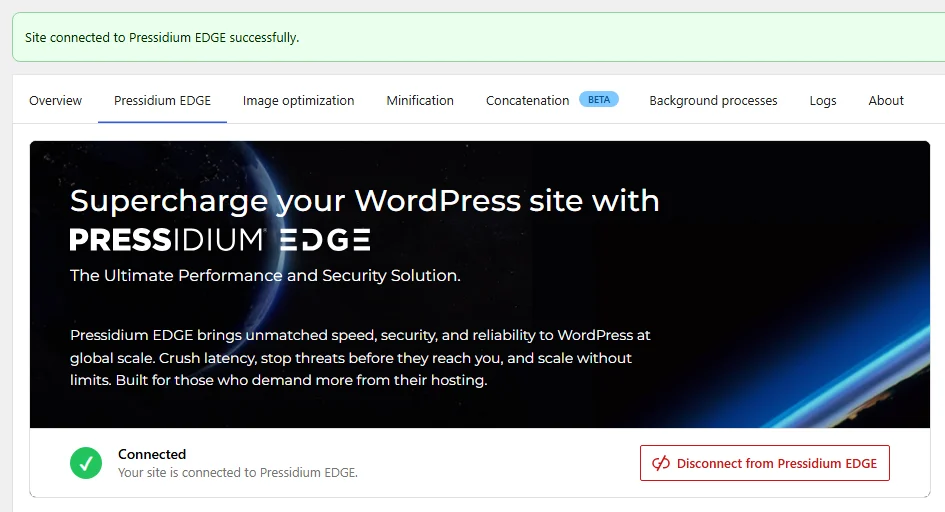
Click Connect to Pressidium EDGE. You should see a confirmation that the connection was successful:
If the connection fails
If Connect to Pressidium EDGE returns an error:
- Check that the Client ID and Client Secret were copied correctly. If you re-issued the Client Secret, make sure you are using the latest value.
- Try connecting again after a few minutes.
- If the issue persists, contact Pressidium Support and include the affected domain and a screenshot of the error.
Finish setup
After the plugin is installed, activated, and connected, click Finish Setup.
You should be redirected to the Domains page.
For a full post-setup review, see Verify Your Setup (Checklist).
Manage the EDGE cache from WordPress
Connecting the Performance Plugin to EDGE unlocks additional cache-management controls in WordPress:
- Purge the entire EDGE cache
- Selectively purge cached content by Cache Tag, URL, or path
To learn how to use these controls, see Purge EDGE cache from the Performance Plugin.
Need help?
If you cannot complete the setup after following the relevant troubleshooting guidance, contact Pressidium Support. Include the affected domain, the step where the issue occurs, and any error message or screenshot.
Where to go next
- To confirm that your site is configured correctly, follow Verify Your Setup (Checklist).
- To manage domains after setup, see Domains.
- To manage the EDGE cache from WordPress, see Purge EDGE cache from the Performance Plugin.
- To review Performance Plugin options, see Performance Plugin settings and features configuration.
Was this article helpful?