

Restore an Instant backup
Use this guide to restore an instant backup to the original website or to another website. You can recover a website, test an earlier version separately, or compare files, content, themes, and plugins between backup versions.
Instant backups are retained for 15 days.
When to use
Restore an instant backup when you want to:
- Recover files or database content on the original website.
- Restore only the website files while keeping the current database.
- Test a backup without changing the original website.
- Compare an earlier backup with the current Production or Staging environment.
- Troubleshoot plugin or theme issues in a separate website.
Prerequisites
Before starting, make sure that:
- The instant backup you need is still available.
- You have access to the source website and the selected destination.
- Your account has an available website slot if you plan to create a new destination website.
- You have confirmed which destination website and environment should be overwritten.
Using the Pressidium Dashboard
- Select Websites from the Dashboard sidebar.
- Click the name of the website that contains the backup. Tip: Press S to open quick search and find the website by name.
- Go to Backups.
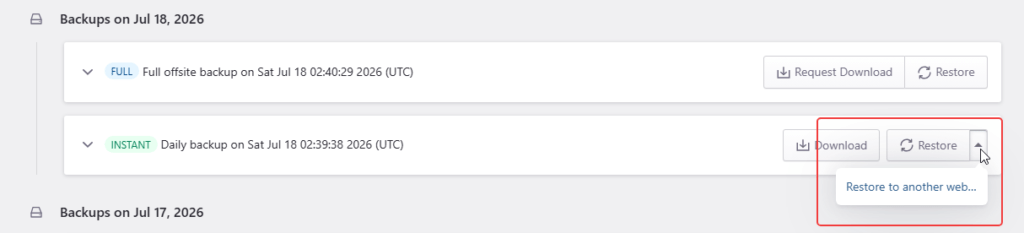
Find the backup you want to restore by checking its description and timestamp.
To make the backup easier to locate:
- Set the backup filter to Show: Instant.
- Click the backup entry to review additional details, including its creation time, WordPress version, plugins, and themes.
Open the Restore menu for the selected backup, then choose whether to restore it to the same website or another website.
Restore to the same website
Select the option to restore the backup to the current website.
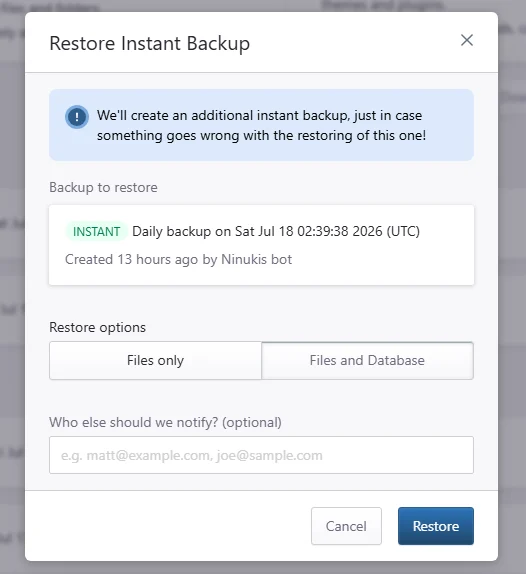
Choose what to restore:
- Files and Database restores the website files and the database from the selected backup.
- Files only restores the website files while leaving the current database unchanged.
You can optionally enter additional email addresses to receive notifications about the restore.
Click Restore to start the process.
Restore to another website
From the selected backup’s Restore menu, choose Another website.
Select the destination type:
- Existing website restores the backup over a website already in your account.
- New website creates a separate website from the backup.
When restoring to an existing website:
- Search for and select the destination website.
- Select the destination environment:
- Production
- Staging
- Confirm that the selected website and environment are correct.
- Click Restore to start the process.
When restoring to a new website, follow the on-screen instructions to create the destination. Your account must have an available website slot.
Verification
You will receive a Dashboard notification when the restore is complete.
After the operation finishes:
- Open the destination website and select the restored environment.
- Confirm that the website loads correctly.
- Review important pages, forms, plugins, themes, and account functionality.
- Clear the website cache if older content still appears.
- If the destination uses a different domain, check whether a database search and replace is required.
Need help?
If you are unsure which backup or destination to use, contact our Support team before starting the restore.
If a restored website does not behave as expected, include the source website, destination website, environment, backup timestamp, and any visible error messages in your request.
Where to go next
- Create an instant backup before making further changes.
- Request an offsite backup restore if the restore point you need is not available as an instant backup.
- Run a database search and replace if the restored website uses a different domain.
- Set up the destination domain and DNS records when the restored website is ready to receive traffic.
- Review access and error logs if the restored website displays errors.
Was this article helpful?